


Nest, Prisma and GraphQL are tools I was using daily at my previous work and I thought to write about them. In this article, we will be building a basic blog to show some relevant concepts relating to these technologies. This article requires a basic understanding of the following;
Prerequisites
Javascript
OOP Concept
Typescript
Project Setup
To create a nest project, you will need to install Nest CLI on your machine using the npm i -g @nestjs/cli and then run nest new project-name to scaffold the project.
Database
We will be using PostgreSQL as the Database and Prisma as our ORM. We first need to install the Prisma client npm install @prisma/client and the Prisma CLI as a dev dependency using the npm install prisma --save-dev command. Prisma is an ORM that allows easy management and interaction of the Database. With Prisma, we create a database schema with Prisma Schema and write type-safe queries to interact with the database using Prisma Client. Let's create a schema.prisma file for our blog. This file serves as the main configuration file for the Prisma setup.
datasource db {
  provider = "postgresql"
  url      = env("DATABASE_URL")
}

generator client {
  provider = "prisma-client-js"
}

model Post {
  id         Int     @id @default(autoincrement())
  title      String
  content    String?
  published  Boolean @default(false)
  user       User   @relation(fields: [userId], references: [id])
  userId     Int
}

model User {
  id    Int     @id @default(autoincrement())
  email String  @unique
  name  String
  posts Post[]
}
In our schema file, we configured the data source and generator at the top. The data source specifies the type of database connection while the generator points to where the Prisma client should be generated, and in our case, the client will be generated in the node_modules directory. You can specify a path within your project directory if you choose to do yours differently. There are two data models, user and post. The relationship defined here is between a user having many posts and a post belonging to a user. The posts field on the user model does not represent a foreign key on this model, this is referred to as a Prisma level relation field which makes it easy to reference relationships when querying with Prisma client. Once the configuration is done, we can run npx Prisma generate to initiate the Prisma client. To migrate the schema file, we run npx Prisma migrate dev command. When working in the local environment of any application, changes are bound to happen and this does not exclude the database and that's why Prisma has a prototyping command npx Prisma db push that synchronises the schema file with the database. Whenever you make a change to your schema file, you can use the command to update your database before finally creating a migration history for any other environment.
Connecting Prisma to the Database
To connect with the Database, we need to create a .env file in the root of our nest project. The file will contain the database URL to connect the application to the PostgreSQL DB. The URL string will look like this DATABASE_URL="postgresql://johndoe:randompassword@localhost:5432/mydb?schema=public" where:
Johndoe = DB user
random password = DB password
mydb = DB name
Prisma Studio
We can use a GUI like pg-admin to interact with our data in PostgreSQL or use Prisma visualisation tool, Prisma studio by running npx prisma studio in the terminal.
NESTJS
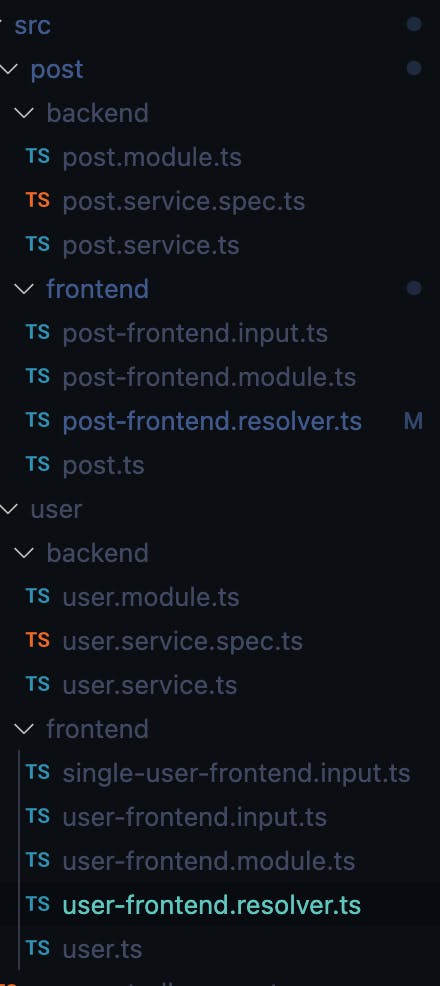
According to the Nest Documentation, Nest is a framework for building efficient, scalable Node.js server-side applications. It has full support for Typescript and combines object-oriented programming, functional programming and functional reactive programming. In the src directory of the project lies nest core files which are app.controller.ts, app.service.ts, app.module.ts and main.ts. The controller contains the route path, handles incoming requests and returns a response, services contain methods to handle retrieval and storage of data, app.module is the root module of the application and main.ts is the entry point of the application. Since we will be using GraphQL we won't require the controller file, so our flow will be services => module=> main For a better structure of the project, in the src directory, we will create a subdirectory consisting of a service and module file for each entity.

In the diagram above, all interactions with the server are kept in the backend folder while the frontend directory will contain all graphQL related stuff. To create a service and module, use the commands nest g service servicename and nest g module modulename respectively. Your folder structure should be like this at the end ;
Creating and Retrieving Data
In the user service file, we will have two methods, one to create a user and the other to retrieve a user from the database. The user service will look as shown below
import { Injectable } from '@nestjs/common';
import { prisma, PrismaClient, User } from '@prisma/client';
const primsa = new PrismaClient()

@Injectable()
export class UserService {
    constructor(){}

     async createUser({name,email}:{name:string,email:string}):Promise<User>{
      return primsa.user.create({
           data:{
                name,
                email
           }
       })
    }
    async getUser(id:number):Promise<User>{
        return primsa.user.findFirst({
            where:{
                id
            }
        })
    }
}
GraphQL
According to the GraphQL documentation, GraphQL is a query language for APIs and a runtime for fulfilling those queries with your existing data. Nest has a built in @nestjs/graphql module to handle all graphQL related stuff. The module can be configured to use either the Apollo or Mercury server. For this article, we will be configuring the Apollo server for our module. To install the module and the server, run npm i @nestjs/graphql @nestjs/apollo graphql apollo-server-express. Once that is installed, we will need to configure the graphQL module in the root module of the application like so;
import { GraphQLModule, Query, Resolver } from '@nestjs/graphql';

@Module({
  imports: [
    GraphQLModule.forRoot({
      driver: ApolloDriver,
      playground: true,
      debug: true,
      autoSchemaFile:'lib/graphql/schema.graphql'
    }),
]
In the code snippet above, the graphQL module refers to the forRootstatic method that takes an options object as an argument.
Debug: it is used by the Apollo server for debuggingPlayground: A GUI used for testing graphQL code. You can access the playground on the same URL the Nest server is running, in our case, it ishttp://localhost:3000/graphqlautoSchemaFile: Specifies where the graphQL schema will be generated. To build our APIs, Nest provides two approaches, code first and schema first approach. We will be using the code-first approach for our development.
QUERY
Any server running GraphQL must have at least one @Query() method to be considered a valid GraphQL server, else an exception will be thrown and the server will fail to start.
Resolver
Resolver is the instructions for turning a GraphQL operation (a query, mutation, or subscription) into data. For our implementation, we will create a resolver for post and user.
@Resolver(() => User)
export class UserResolver{
    constructor(private readonly userService:UserService, private   readonly postService:PostService){}
 }
@Resolver()
export class PostFrontendResolver {
    constructor(private readonly postService: PostService) {}
}
Object Type
Before creating our resolver class, we need to create an object type. Object type represents a collection of fields the application will want to interact with. For example in our API, we will need to fetch a user or a post and the object type provides the fields in the data object that is returned to the API endpoint.
import { Field, Int, ObjectType } from "@nestjs/graphql";

@ObjectType()
export class Post {
    @Field(() => Int)
    readonly id: number;

    @Field()
    readonly title: string;

    @Field()
    readonly content: string;

    @Field()
    readonly published: boolean;

    constructor(id: number, title: string, content: string, published: boolean) {
        this.id = id;
        this.title = title;
        this.content = content;
        this.published = published;
    }
}
import { Field, ObjectType } from "@nestjs/graphql";

@ObjectType()
export class User{
    readonly id:number
    @Field()
    readonly email:String
    @Field()
    readonly name:String

    constructor(id:number, email:string, name:string){
        this.id = id
        this.email = email
        this.name = name
    }
}
The object type classes above are annotated with the @objectType() decorator respectively. The @Field() decorator provides metadata about each field's GraphQL type, in the case of the id field with number type, the field decorator takes an optional type function to provide clarity on the type. This is required when there is an ambiguity between the TypeScript type system and the GraphQL type system.
Mutation
Mutation is graphQL's request method to write or modify server side data. For our blog, we will be creating a mutation to create a user and post respectively in the resolver class.
   @Mutation(() => User, {name:'createUser'})
    async createUser(@Args('input')input:UserFrontendInput):Promise<User>{
        const user = await this.userService.createUser(input)
        return user
    }
 @Mutation(() => Post , {name:'createPost'})
    async createPost(@Args('input')input:PostFrontendInput):Promise<Post>{
        const post = await this.postService.createPost(input)
        const {id,title,content,published}:{id:number,title:string,content:string,published:boolean} = post
        return new Post(id,title,content,published)
    }
Input Type
Input Type decorator represents a special object type that can be passed in as an argument, when creating a mutation, you can create an input type to define the object that will be sent from the app to the endpoint. We define input type classes for user and post mutation like so;
import { Field, InputType } from "@nestjs/graphql";

@InputType()
export class UserFrontendInput{
@Field()
 readonly email:string
 @Field()
 readonly name:string
}
import { Field, InputType, Int } from "@nestjs/graphql";

@InputType()

export class PostFrontendInput{
    @Field(() => Int)
    userId:number
    @Field()
    title:string
    @Field()
    content:string
    @Field({nullable:true})
    published:boolean
}
Resolve Field
The resolve field decorator is used to annotate the method that resolves the relationship between two models. In our case, we need to resolve the posts field in the User model.
 @ResolveField(() => [Post], {name:'posts'})
    async getUserPosts(@Parent() user:User):Promise<Post[]>{
        return this.postService.getUserPosts(user.id)
    }
The resolve field decorator must return a type and, in this case, it returns the post objectType. This signifies that a user can have at least one post. The name options argument will be used in the query to reference this resolve field. Resolver's Final Look
import { Args, Mutation, Parent, Query, ResolveField, Resolver } from "@nestjs/graphql";
import { PostService } from "src/post/backend/post.service";
import { Post } from "src/post/frontend/post";
import { UserService } from "../backend/user.service";
import { SingleUserFrontendInput } from "./single-user-frontend.input";
import { User } from "./user";
import { UserFrontendInput } from "./user-frontend.input";

@Resolver(() => User)
export class UserResolver{
    constructor(private readonly userService:UserService, private readonly postService:PostService){}

    @Mutation(() => User, {name:'createUser'})
    async createUser(@Args('input')input:UserFrontendInput):Promise<User>{
        const user = await this.userService.createUser(input)
        return user
    }
    @Query(() => User, {name:'user'})
    async getUser(@Args('input')input:SingleUserFrontendInput):Promise<User>{
        return this.userService.getUser(input.id)
    }
    @ResolveField(() => [Post], {name:'posts'})
    async getUserPosts(@Parent() user:User):Promise<Post[]>{
        return this.postService.getUserPosts(user.id)
    }
}
import { Args, Mutation, ResolveField, Resolver } from "@nestjs/graphql";
import { PostService } from "../backend/post.service";
import { Post } from "./post";
import { PostFrontendInput } from "./post-frontend.input";

@Resolver()
export class PostFrontendResolver {
    constructor(private readonly postService: PostService) {}

    @Mutation(() => Post , {name:'createPost'})
    async createPost(@Args('input')input:PostFrontendInput):Promise<Post>{
        const post = await this.postService.createPost(input)
        const {id,title,content,published}:{id:number,title:string,content:string,published:boolean} = post
        return new Post(id,title,content,published)
    }

}
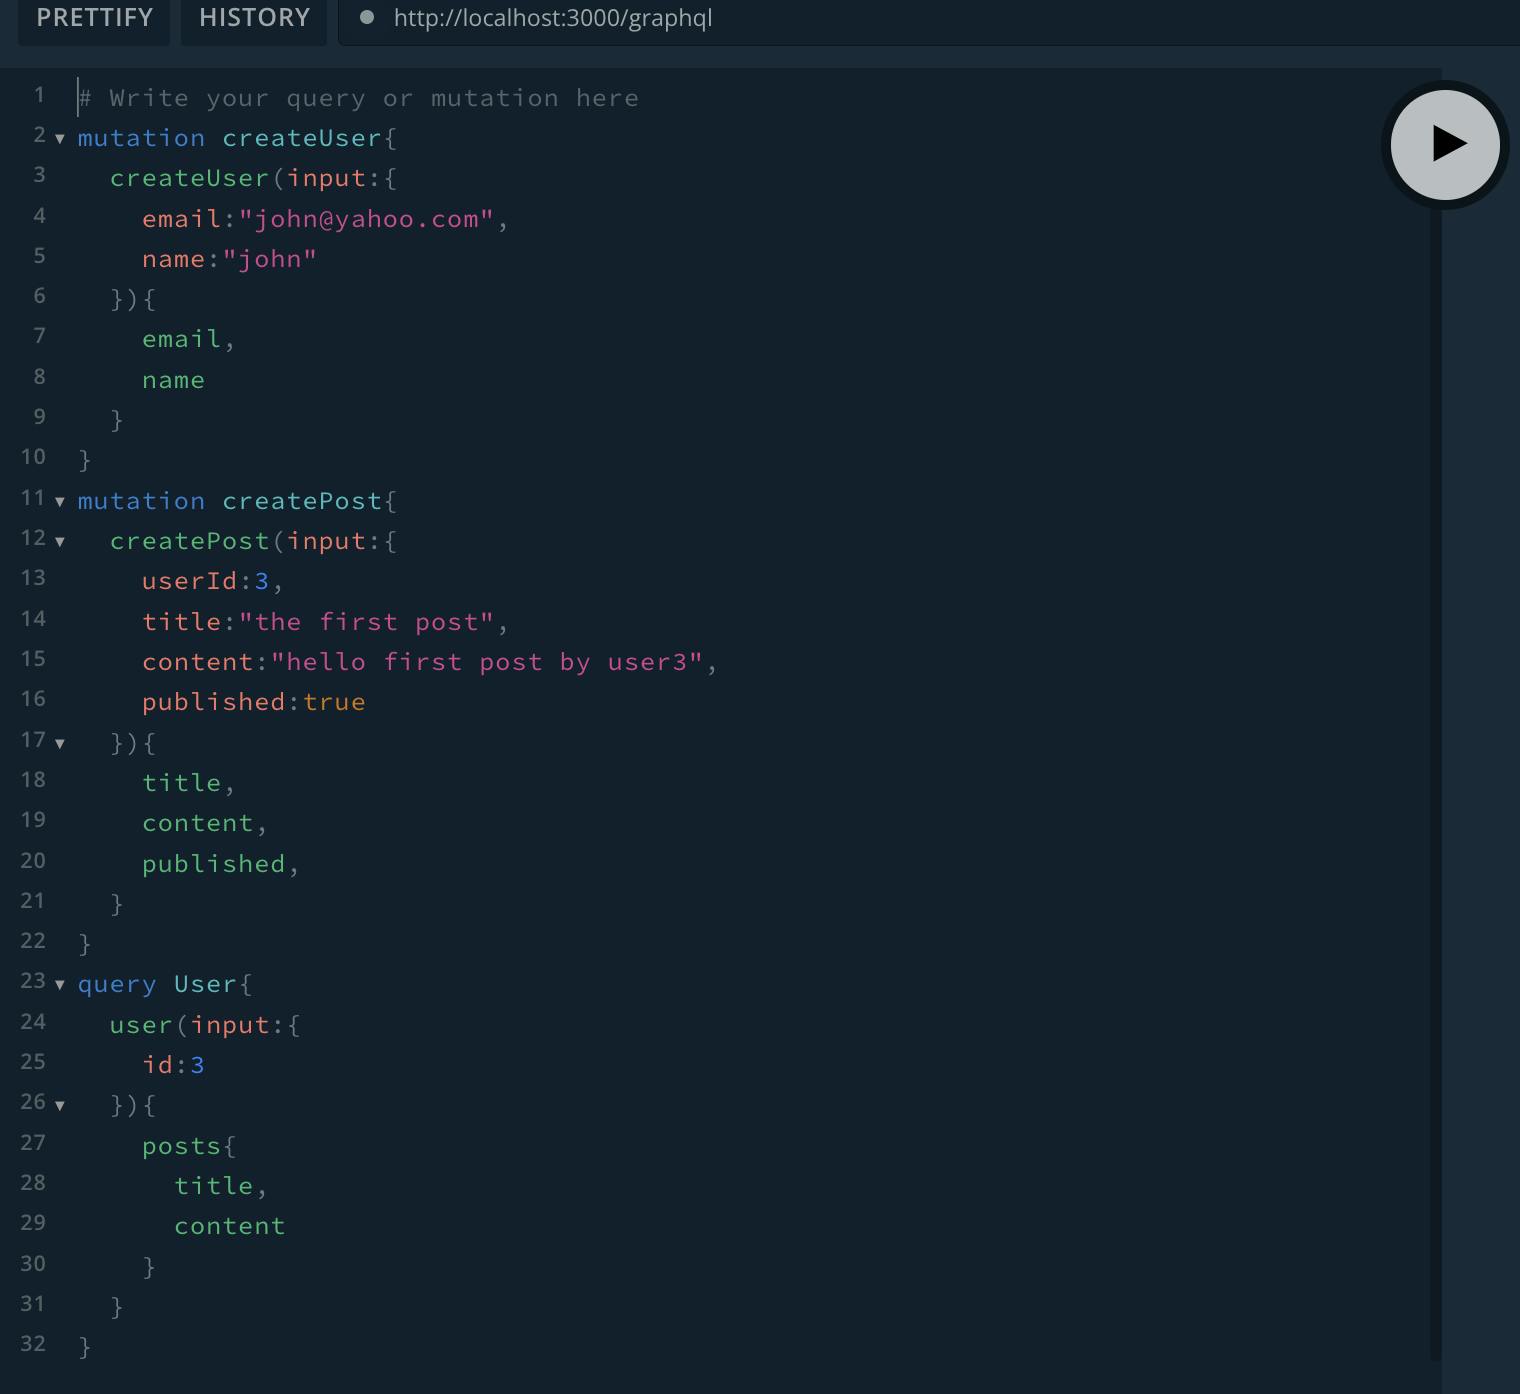
GRAPHQL PLAYGROUND
We can test out our queries and mutation using GraphQL Playground. Run npm start to start the Nest server.
Conclusion
This article shows how to get started with Nest, Prisma and GraphL by building some endpoints for a makeshift blog. The source code for this article is on my GitHub